

I built mine out of good ole Georgia red clay using Kiko Denzer's book, "Build Your Own Earth Oven", and Simon Brooke's "Build a Traditional Wood-Fired Clay Oven" as my primary guides. There are plenty of how-to videos on-line as well. Plus, you can see how I built mine here and I'm happy to lend any advice. When all was said and done I only had about $150 invested in it, not including the necessary oven tools - pizza peel, oven brush, rooker, shovel, ember bucket, etc. Some of these can be handmade.
Wood-burning ovens do many things well - outstanding pizza for sure, but also breads, slow roasted meats with a wonderful smoky perfume, sausages, roasted vegetables, baked beans cooked overnight low-and-slow, even baked desserts like crumbles, crisps and tarts. Almost anything you can cook in a conventional oven can be made in a wood-burning oven. So, go ahead, channel your inner Old World peasant!
Here are a few things I've made in ours -


Got these retaining wall blocks on sale at Home Depot, the cats were free...


 I used masonry cement to hold them together.

I Built up cinder blocks inside until about a foot from the top.
Laid overlapping sheets of galvanized flashing to make a floor.


Lay out and position the fire bricks for the floor of the oven.


Make sure everything is nice a level all through the construction.

Used thinner fire bricks set on edge around the perimeter of the inside of the oven to protect the clay walls from wear and tear from wood, burning embers and pokes and prods from oven tools.


On top of the metal floor I layered building soil to cradle empty wine bottles. Glass bottles make a good insulation for the oven floor.

Next clay slip mixed with wood shavings is packed in and around the bottles. This adds more insulation and stability to the bottles.
Next fill the top of the base with sand.
Make sure everything is flat and level.

Lay out and position the fire bricks for the floor of the oven.
Make sure everything is nice a level all through the construction.

Used thinner fire bricks set on edge around the perimeter of the inside of the oven to protect the clay walls from wear and tear from wood, burning embers and pokes and prods from oven tools.

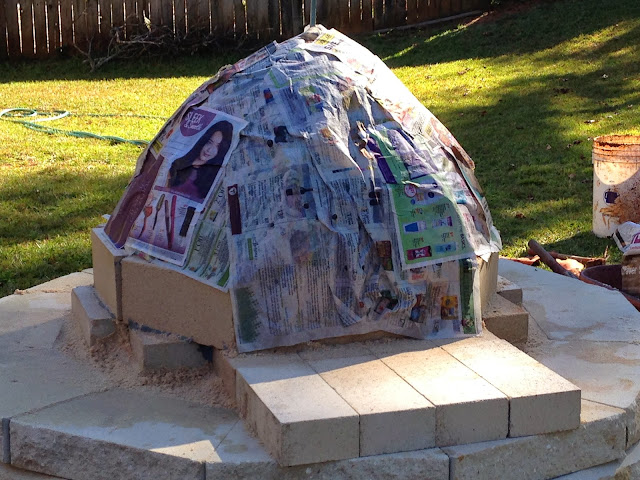
The height of the inside of the oven dome for this size oven needs to be 16". I cut a dowel and marked it at 16" then set it in the sand mound so it would be easy to tell when the sand reached 16".

It's important to keep the sand damp so it doesn't collapse but not too wet. Cover with wet newspaper. The newspaper will act as a barrier between the sand and the clay you will be adding next.

Put the clay and sand on a 9' x 9' heavy tarp and worked it with my feet. This makes it easier to mix the clay with the sand and water.
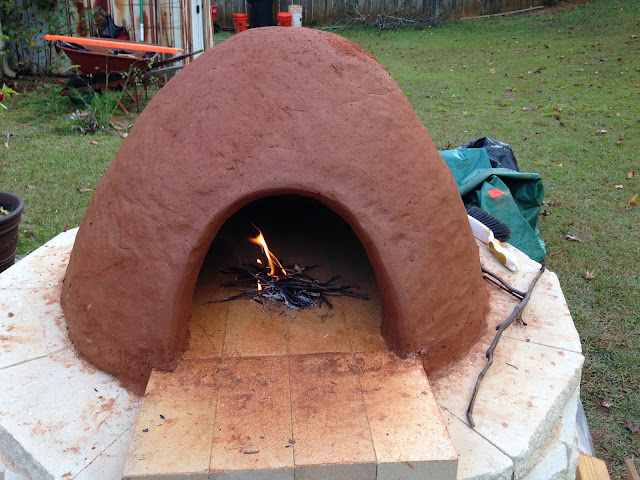
Built a small warming fire to help dry the clay shell.

Building a brick arch over the oven door. Set the bricks up to see how they all would fit.
The dowel rods under the arch form are there to help remove the form from the mortared bricks. After the mortar is set, pull the dowels out and the form will drop down and it will be easy to pull out from under the arch.
The keystone in the arch is a hand made Georgia red clay brick well over 150 years old from the site of what was once the Fitzgerald plantation about 2 miles from here. I found it years ago while relic hunting. The Fitzgerald farm was Margaret Mitchel's great grandfather's farm/plantation. This farm is what she based Tara, Scarlett O'Hara's plantation, in Gone With the Wind. This brick was part of the original house. But the original Tara looked nothing like the Tara in the movie, it was more like the typical Georgia farm house of that era.
Here is a photo of the Fitzgerald house -
Now for the insulation layer
Clay slip (sloppy wet clay) mixed with wood shavings. Then made into "bricks" to cover the oven.


Adding a chimney

Built a second small warming fire today - Nov 15 to help dry out and cure the oven shell. The chimney is working very well and Vesuvius has no problem keeping a fire going!
November 22 - Made the first pie, actually two of them.
And, here it is fresh out of the oven
Pizza came out great with a nice crispy crust and a bit of char on the edges. Broke open a bottle of the wine we made from our backyard Norton grapes. Life is good!
Adding the final layer - Clay, sand, chopped up wheat straw and water. Blend these all together to a spreadable consistency. Use a masonry towel to spread over the insulation layer.
where did you obtain your clay?
ReplyDelete