Monday, March 31, 2014
Cat's Cradle
"Busy, busy, busy. How complicated and unpredictable the machinery of life really is." Kurt Vonnegut, from Cat's Cradle
Sunday, March 30, 2014
Roasted Radishes
I'm not a picky eater but if I had to list my least favorite foods, near the top would be radishes. I push them to the side in salads and will not eat them whole out of hand even with a little salt. Just don't like them.
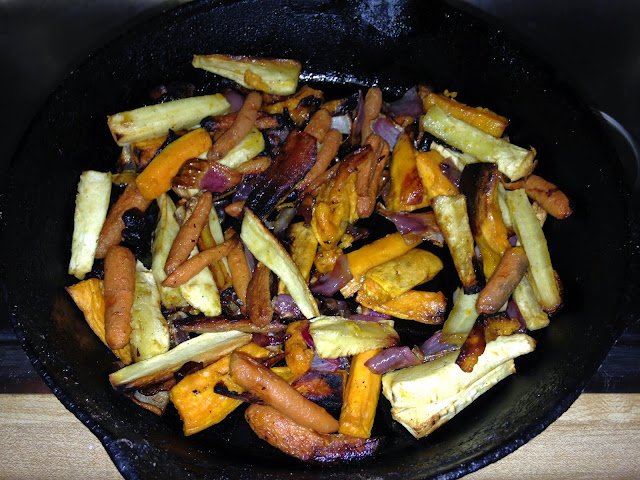
That said, I have just found my newest favorite vegetable - radishes - roasted radishes that is. We've roasted all kinds of vegetables, from tomatoes to root vegetables but never radishes. Tonight we did them as a side dish to roasted herbed chicken breasts. Roasted radishes develop a sweet caramelized 'green' flavor close in taste to roasted Brussels sprouts. Yes, nice!
Prep couldn't simpler -
- Pre heat the oven to 450
- Wash and cut the radishes in half
- Put them in a casserole dish drizzle with about a tablespoon or two of olive oil,
- Sprinkle with a tablespoon of thyme and a pinch of salt and pepper.
- Stir together
- Roast until nice and brown about 30 min total, stirring after the first 15 minutes. If they look like they need more time put back in for 10 minutes more or until they take on a good roasted look like in the photo above.
Roasted herbed chicken breasts (we used Herbes de Provence) with lemon slices under the skin and 7 cloves of garlic sliced in half and cooked in the chicken juices. Put the garlic on top of the breasts when serving and eat with the chicken. Add a half a cup of white wine to the chicken juices toward the end and spoon over the chicken.That's right!
Saturday, March 29, 2014
Fear and Loathing with Kataifi
Kataifi? What's that? We didn't know either. Kataifi (pron: ka-tye'-if-ee) is Greek shredded phyllo dough. It looks like shredded wheat. By accident I found this video on Greek Recipes.TV (http://www.greekrecipes.tv/304/shrimp-wrapped-in-kataifi-phyllo) showing how to make kataifi wrapped shrimp. After watching the video, we immediately knew we had to try to make them. The cook, Patricia Vasos, made it look interesting AND easy. Simply open up the kataifi. pull off some shreds, wrap it around a few shrimp poke in a wooden skewer and fry. You've got yourself some really cool looking wiry crunchy shrimp. Plus the ingredients in the dipping sauce sounded perfect. What could be simpler, right?
The first challenge was finding the kataifi. But with the help of a Greek friend, we located some here in Atlanta at the International Bakery on Cheshire Bridge Road. We will be regular customers of this market. Loaded with all kinds of imported Mediterranean food plus fresh made Greek cakes, pastries and sweets.
We made the shrimp and the killer dipping sauce for dinner along with fava beans & artichoke hearts and basmati rice with almonds and apricot preserves as sides. This is how it all looked on the plate, but between opening the package of phyllo and getting all this on the table, the journey was a Greek Odyssey of it's own - a little more complicated than we anticipated but we had fun. Lisa handled the kataifi wrapping process while I made the dipping sauce and marinated the shrimp. We divided up making the rest of the meal.
Marinate the shrimp in olive oil, butter, garlic, oregano and salt & pepper. Mix together with your hands, it's OK. Then put in refrigerator for an hour.
Meanwhile make the dipping sauce - Into the food processor - Greek yogurt, olive oil, mustard, parsley, green onion, garlic, lemon juice, capers, salt & pepper.
The first challenge was finding the kataifi. But with the help of a Greek friend, we located some here in Atlanta at the International Bakery on Cheshire Bridge Road. We will be regular customers of this market. Loaded with all kinds of imported Mediterranean food plus fresh made Greek cakes, pastries and sweets.
We made the shrimp and the killer dipping sauce for dinner along with fava beans & artichoke hearts and basmati rice with almonds and apricot preserves as sides. This is how it all looked on the plate, but between opening the package of phyllo and getting all this on the table, the journey was a Greek Odyssey of it's own - a little more complicated than we anticipated but we had fun. Lisa handled the kataifi wrapping process while I made the dipping sauce and marinated the shrimp. We divided up making the rest of the meal.
On the plate - the kataifi wrapped shrimp, sautéed fava beans & artichoke hearts and basmati rice with toasted almonds and apricot preserves.
This is what kataifi looks like right out of the package. Recipe below.
Marinate the shrimp in olive oil, butter, garlic, oregano and salt & pepper. Mix together with your hands, it's OK. Then put in refrigerator for an hour.
Meanwhile make the dipping sauce - Into the food processor - Greek yogurt, olive oil, mustard, parsley, green onion, garlic, lemon juice, capers, salt & pepper.
Put in the fridge for an hour
Sautee the shrimp with the marinade
It will look like this. Let cool.
Lisa working the kataifi
Pull shreds of phyllo and brush with butter. Work on wax paper.
Wrap the shrimp with the kataifi. It had a tendency to break though.
Brush the wrapped shrimp with melted butter
Line the wrapped shrimp up on a baking sheet
Push skewers into the shrimp
Quick fry just to get the kadtifi brown and crunchy, maybe 10 seconds or less. Greek Recipes called for frying in extra virgin olive oil but we used olive oil/canola oil blend.
Well... this is what happened. At first most of the kataifi fell off the shrimp in the oil... But we developed a technique - twisting the shrimp as it fried, like twirling spaghetti.
We got better at it eventually.
Lisa's kataifi wrapped angelfish from our aquarium...
Sautéed fava beans and artichoke hearts.
Here are the ingredient amounts
Shrimp & Marinade:
1 lb medium/large shrimp
1/4 cup melted unsalted butter
1/4 cup olive oil
2 cloves garlic minced
1 teaspoon dried oregano
Salt & Pepper
- Put marinade ingredients in a bowl and add the shrimp
- mix together
- chill in refrigerator about an hour
- Put marinade ingredients in a bowl and add the shrimp
- mix together
- chill in refrigerator about an hour
Dipping Sauce
1/2 cup olive oil
2 tablespoons brown grainy mustard
2 cups plain Greek yogurt
3 cloves garlic chopped
1 teaspoon white wine vinegar
2 tablespoons sugar
2 tablespoons chopped parsley
1/4 cup capers rinsed
1 green onion sliced
1/4 cup lemon juice
- Blend in a food processor
- Chill in refrigerator
Favas & Artichoke Hearts
1 lb fava beans in pods - need to be shelled and prepped
1 package frozen artichoke hearts
3 cloves garlic sliced thin
1 teaspoon dried thyme or 2 teaspoons fresh
Olive oil
Salt & Pepper
- Sautee the artichoke hearts in olive oil with thyme, til browned.
- Add the fava beans and garlic. Sautee on med heat for about 10 min.
Rice
1 cup basmati rice
1/2 medium onion chopped
1/4 cup almonds roughly chopped, toasted
Zest of one lemon
Zest of one lemon
1 tablespoon apricot preserves
Salt & Pepper
- Toast the almonds, set aside
- Sautee the onion, set aside
- Cook the rice as recommended on package
- When rice is done, stir in the almonds, onion, lemon zest and apricot preserves
Friday, March 28, 2014
We Are Here To Do
We are here to do.
And through doing, to learn;
and through learning, to know;
and through knowing, to experience wonder;
and through wonder, to attain wisdom;
and through wisdom, to find simplicity;
and through simplicity, to give attention;
and through attention, to see what needs to be done.
Pirkei Avot (Ethics of the Fathers) 5:27
Saturday, March 22, 2014
Ischia Fig Tree
Just finished planting the new Green Ischia (pronounced: Isk' -ya) fig tree. Got it from Ison's Nursery in Brooks, GA. (www.isons.com)
This is our third fig tree. We also have a Brown Turkey and a Black Mission. I am excited about this new addition. Green Ischias are named for Ischia, an island in the bay of Naples, Italy. The fruit has greenish-yellow skin with red interior. Because these figs stay green in color when ripe, they have great resistance to birds. The color helps to camouflage the ripe fruit. Ischia ripens from late July to August. Maybe not this first year but next we should be eating some of these delicious figs.
The fruit is yellowish green with a red interior. Pretty cool!
It came bare rooted.
In the ground, double trunked and standing all of 39"tall. Since Ischia fig trees need an alkaline soil, lime needed to be added to the soil mix.
Monday, March 17, 2014
Corned Beef & Cabbage and Colcannon
OK, so it's a cold rainy St. Patrick's Day. What could be more appropriate to have for dinner (even in the middle of Lent...) than these hearty iconic Irish plate fillers. Look for Bangers and Mash another day. Left over corned beef is great for home-made reubens. That's right!
Here is our little 3 lb corned beef covered in a brown sugar, apricot jam and grainy mustard glaze surrounded by cabbage wedges and carrots, with a bottle of Harp poured in for good measure.
And right along side, colcannon - mashed red potatoes with braised kale rounded out the meal. Read more for the instructions.
We started with a typical corned beef (well kind of typical, with that odd knob of meat sticking up through the fat cap...) that you can find at any grocery store. Roasted it in a covered roasting pan for 4 hours at 300 degrees (rule of thumb - cook approx.1 hr per pound, but we let this go longer). To give it a little pop, we made a glaze of brown sugar, apricot preserves and grainy mustard, about a tablespoon of each stirred together and spread over the roast 2 hours in. Also added a bottle of Irish beer - Harp in this case for flavor and to keep the roast moist.
An hour before end of cooking time add a cabbage cut into wedges and a couple carrots cut into pieces on the bias. Put the lid back on.
Done
For the colcannon -
Kale and red potatoes (and a Harp because... why not?)
Sautee 4 big handfuls of kale with 3 minced cloves of garlic and half a medium onion chopped.
Boil and mash 6 - 7 medium red potatoes (leave the skin on), add milk, butter, salt and pepper. Then stir in the kale.
On the cutting board
On the plate
Sunday, March 16, 2014
Rigatoni with Pork Ragu and crostini with goat cheese, apricot and caramelized onions
Tuesday, March 11, 2014
Fava Beans
Our favas are up! Spring must just be about to arrive. Sorry Chicago, Detroit, Toledo, Buffalo and New England. Fava beans are a better prognosticator for the end of winter, at least down here, than Punxautawney Phil is up north...
Caponata
Caponata is a traditional southern Italian eggplant dish that typically includes eggplant, sweet pepper, onion, celery, olives, tomatoes, capers, pine nuts, raisins, red wine vinegar and fresh basil. It has a sweet & sour (agrodolce) flavor profile. Can be used as a side dish for fish or chicken or part of an antipasti platter or on bruschetta. Best served at room temp. A lot of different flavors and textures going on. Great summer treat.
2 cups of celery, sliced thin on a bias
3/4 cup of onions, chopped
1 Yellow (or red) bell pepper chopped
1/3 cup of red wine vinegar, mixed with a handful of golden raisins
2 cups of drained canned Italian plum or whole fresh ripe tomatoes - chopped
2 tablespoons of tomato paste
9 Green olives, pitted and cut in large pieces - use good ones like Castelvetrano from an Italian market, not those grocery store green olives with pimentos in brine - they have the wrong taste.
2 tablespoons of capers - rinsed
2 tablespoons of pine nuts - toasted
Handful of fresh basil - torn by hand
salt and ground pepper to taste
Cut eggplant into 1 inch cubes. Sprinkle cubes of eggplant with salt and set them in a colander in the sink to drain. After 30 minutes, rinse them and pat dry with paper towels and set them aside.
Heat 1/4 cup olive oil in a large heavy frying pan, add celery, onion and pepper. Cook over moderate heat, stirring frequently for 10 minutes until celery, onion and pepper are soft and lightly colored but not mushy. With slotted spoon transfer to bowl.
Pour remaining 1/4 cup oil in skillet and over high heat saute the eggplant in it, stirring and turning about 8-10 minutes until they are lightly browned.
Return celery, onion and peppers to the pan, stir in the vinegar and raisins, the tomatoes, tomato paste, green olives and capers and salt and pepper. Bring to a boil, reduce heat. Simmer, uncovered, stirring for 10-15 minutes. Take off heat and let cool. Stir in pine nuts and the basil.
Serve at room temperature.
I think you will like this but you need to make it a few times to get the amount of ingredients and the timing right to suite your taste. Like a lot of Italian food, this is better the next few days, so you can make it ahead of time and keep it in the refrigerator. Don’t re-heat it though just let it come to room temp by itself.
Caponata might not be very photogenic, but in person, it's beautiful in both taste and looks. For the recipe -
2 medium sized eggplants
1/2 cup of olive oil2 cups of celery, sliced thin on a bias
3/4 cup of onions, chopped
1 Yellow (or red) bell pepper chopped
1/3 cup of red wine vinegar, mixed with a handful of golden raisins
2 cups of drained canned Italian plum or whole fresh ripe tomatoes - chopped
2 tablespoons of tomato paste
9 Green olives, pitted and cut in large pieces - use good ones like Castelvetrano from an Italian market, not those grocery store green olives with pimentos in brine - they have the wrong taste.
2 tablespoons of capers - rinsed
2 tablespoons of pine nuts - toasted
Handful of fresh basil - torn by hand
salt and ground pepper to taste
Cut eggplant into 1 inch cubes. Sprinkle cubes of eggplant with salt and set them in a colander in the sink to drain. After 30 minutes, rinse them and pat dry with paper towels and set them aside.
Heat 1/4 cup olive oil in a large heavy frying pan, add celery, onion and pepper. Cook over moderate heat, stirring frequently for 10 minutes until celery, onion and pepper are soft and lightly colored but not mushy. With slotted spoon transfer to bowl.
Pour remaining 1/4 cup oil in skillet and over high heat saute the eggplant in it, stirring and turning about 8-10 minutes until they are lightly browned.
Return celery, onion and peppers to the pan, stir in the vinegar and raisins, the tomatoes, tomato paste, green olives and capers and salt and pepper. Bring to a boil, reduce heat. Simmer, uncovered, stirring for 10-15 minutes. Take off heat and let cool. Stir in pine nuts and the basil.
Serve at room temperature.
I think you will like this but you need to make it a few times to get the amount of ingredients and the timing right to suite your taste. Like a lot of Italian food, this is better the next few days, so you can make it ahead of time and keep it in the refrigerator. Don’t re-heat it though just let it come to room temp by itself.
Monday, March 10, 2014
Building and Enjoying a Wood-fired Clay Oven
If you enjoy barbecuing, have a smoker or a Big Green Egg/Kamado, you've thought about it. I know it's gone through your mind. You've seen the photos in magazines and on the Internet. Those cool looking backyard wood-fired ovens, a long handled pizza peel leaned against it... flames dancing inside... smoke coming out of the chimney... pizza bubbling away on the oven floor. And, in your mind's eye, you know the perfect spot in your backyard to put one. But then, you find out how much those things cost. You could spend two, three thousand dollars on a nice prefabricated wood fired oven, and then have to have it shipped or... if you're fairly handy and up for a rewarding challenge, consider building a clay oven for a fraction of that and have the satisfaction of having built it yourself. You can make them as elaborate or as simple as your ability and creativity allow. Just have fun.
In the beginning...
Got these retaining wall blocks on sale at Home Depot, the cats were free...
I Built up cinder blocks inside until about a foot from the top.
I built mine out of good ole Georgia red clay using Kiko Denzer's book, "Build Your Own Earth Oven", and Simon Brooke's "Build a Traditional Wood-Fired Clay Oven" as my primary guides. There are plenty of how-to videos on-line as well. Plus, you can see how I built mine here and I'm happy to lend any advice. When all was said and done I only had about $150 invested in it, not including the necessary oven tools - pizza peel, oven brush, rooker, shovel, ember bucket, etc. Some of these can be handmade.
Wood-burning ovens do many things well - outstanding pizza for sure, but also breads, slow roasted meats with a wonderful smoky perfume, sausages, roasted vegetables, baked beans cooked overnight low-and-slow, even baked desserts like crumbles, crisps and tarts. Almost anything you can cook in a conventional oven can be made in a wood-burning oven. So, go ahead, channel your inner Old World peasant!
Here are a few things I've made in ours -
Got these retaining wall blocks on sale at Home Depot, the cats were free...
I Built up cinder blocks inside until about a foot from the top.
Laid overlapping sheets of galvanized flashing to make a floor.
Lay out and position the fire bricks for the floor of the oven.
Make sure everything is nice a level all through the construction.
Used thinner fire bricks set on edge around the perimeter of the inside of the oven to protect the clay walls from wear and tear from wood, burning embers and pokes and prods from oven tools.
On top of the metal floor I layered building soil to cradle empty wine bottles. Glass bottles make a good insulation for the oven floor.
Next clay slip mixed with wood shavings is packed in and around the bottles. This adds more insulation and stability to the bottles.
Make sure everything is flat and level.
Lay out and position the fire bricks for the floor of the oven.
Make sure everything is nice a level all through the construction.
Used thinner fire bricks set on edge around the perimeter of the inside of the oven to protect the clay walls from wear and tear from wood, burning embers and pokes and prods from oven tools.
The height of the inside of the oven dome for this size oven needs to be 16". I cut a dowel and marked it at 16" then set it in the sand mound so it would be easy to tell when the sand reached 16".
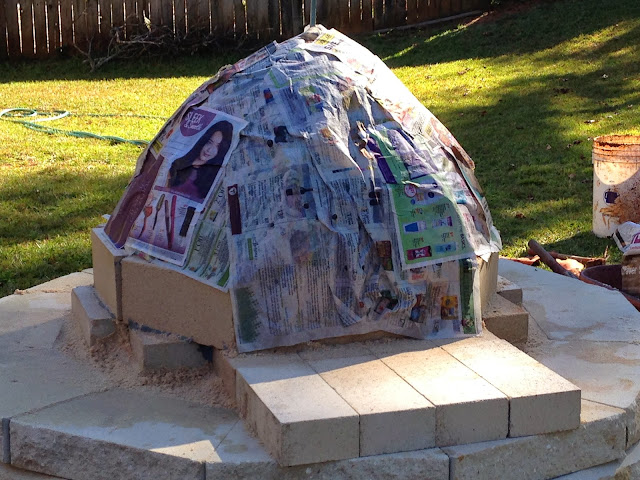
It's important to keep the sand damp so it doesn't collapse but not too wet. Cover with wet newspaper. The newspaper will act as a barrier between the sand and the clay you will be adding next.
Put the clay and sand on a 9' x 9' heavy tarp and worked it with my feet. This makes it easier to mix the clay with the sand and water.
Building a brick arch over the oven door. Set the bricks up to see how they all would fit.
The dowel rods under the arch form are there to help remove the form from the mortared bricks. After the mortar is set, pull the dowels out and the form will drop down and it will be easy to pull out from under the arch.
The keystone in the arch is a hand made Georgia red clay brick well over 150 years old from the site of what was once the Fitzgerald plantation about 2 miles from here. I found it years ago while relic hunting. The Fitzgerald farm was Margaret Mitchel's great grandfather's farm/plantation. This farm is what she based Tara, Scarlett O'Hara's plantation, in Gone With the Wind. This brick was part of the original house. But the original Tara looked nothing like the Tara in the movie, it was more like the typical Georgia farm house of that era.
Here is a photo of the Fitzgerald house -
Now for the insulation layer
Clay slip (sloppy wet clay) mixed with wood shavings. Then made into "bricks" to cover the oven.
Adding a chimney
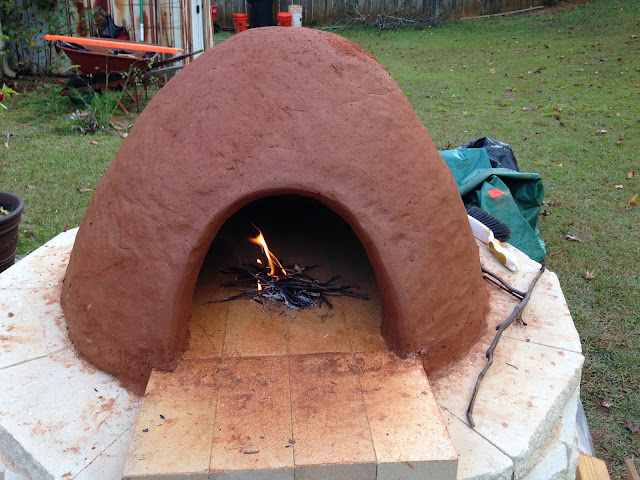
Built a second small warming fire today - Nov 15 to help dry out and cure the oven shell. The chimney is working very well and Vesuvius has no problem keeping a fire going!
November 22 - Made the first pie, actually two of them.
And, here it is fresh out of the oven
Pizza came out great with a nice crispy crust and a bit of char on the edges. Broke open a bottle of the wine we made from our backyard Norton grapes. Life is good!
Adding the final layer - Clay, sand, chopped up wheat straw and water. Blend these all together to a spreadable consistency. Use a masonry towel to spread over the insulation layer.
Subscribe to:
Posts (Atom)