Tuesday, December 15, 2020

Rustic Salmon Wellington

I would guess most people have heard of Beef Wellington but that's about as far as their understanding goes. It's just some fancy pants dish that they would probably like. It has beef in it after all.  Because we are food nerds, and like to tinker, we took the classic flavors and textures of Beef Wellington and transformed them into a rustic preparation for salmon. Use any mushroom you like — white button, cremini or mixed wild mushrooms are all good choices.

Ingredients
3 1/2 tablespoons unsalted butter 
1/2 pound mushrooms very finely chopped
2 shallots finely chopped
2 teaspoons chopped fresh thyme  or 1 tsp dry 
1 (14.0-ounce) package frozen puff pastry thawed but very cold
2 pieces center-cut skinless salmon fillet about 1/3 lb each
2 Tablespoons Dijon mustard
1/2 cup dry white wine - Sauvignon Blanc or Pinot Grigio work well
1 large egg whisked with 1 teaspoon water
1 teaspoon fine sea salt divided
1/2 teaspoon ground black pepper divided


In a large skillet over medium heat, melt 1 1/2 tablespoons butter and add the minced shallots. Stir frequently and cook until the shallots are translucent.


Add mushrooms,  the thyme. Cook, stirring frequently, until mushrooms are tender and almost completely dry, about 8 minutes. Add the white wine and cook until the wine reduces and the mixture is dry. Set aside to let cool.


Preheat the oven to 400°F. On a well-floured surface, roll out pastry to a rectangle about 21 x 16 inches. Use a sharp knife or pizza wheel to cut into 2 pieces, each about 8 x 10 inches. Smear the Dijon mustard over both salmon filets and season on all sides lightly with salt and pepper. 

Place a piece of salmon on each piece of puff pastry to get an idea of the area it will cover and spread a layer of the mushrooms. If any ends of the salmon are particularly thin, tuck them under so the pieces are fairly uniform in thickness. Top salmon with mushroom mixture. Use your finger to moisten edges of pastry with a little water, then fold pastry sides in like a package and press to seal, completely covering the salmon and mushrooms. 


Arrange seam-side down on a baking sheet lined with parchment paper and place in the freezer for 15 minutes.

Meanwhile, brush the tops of the pastry with the egg wash and bake in the top third of the oven until pastry is golden brown, about 25 minutes. 


Monday, December 14, 2020

Pistachio Orange Biscotti

Biscotti are good any time but they make great Christmas treats this time of year to have around the house and to give to friends. The basic recipe for biscotti is very simple but where they really get a personality is by making use of a wide array of complimentary ingredients - dried fruit bits like cranberries, candied citrus peel, almonds, pistachios, fennel seeds, chocolate bits. They can also be dipped in either white or dark chocolate. But don't go crazy and turn them into little fruit cakes, just stick with one or two additions. Here is a basic recipe I use, just substitute the pistachios and candied orange peel for one or two other ingredients that you like. 

Ingredients - this will make about 24 - 4" x 1 1/2" biscotti

1 cup shelled unsalted pistachios
1/3 cup candied lemon or orange peel
1/2 cup (1 stick) unsalted butter - softened
3 eggs
1 cup sugar
1 teaspoon vanilla extract
3 1/2 cups all-purpose flour
1 teaspoon baking powder
1/2 teaspoon salt

Directions

*** If you are shelling the pistachios yourself, double check to make sure no bits of shell haven't fallen in with the pistachio meat. It's not fun to bite into a hard piece of pistachio shell.

Preheat the oven to 350 degrees F.

Lay the pistachios on a cookie sheet in a single layer. Bake for 10 minutes or until the nuts are lightly toasted. Remove from the oven.

In an electric mixer, beat the butter until light and fluffy. With the mixer running (or by hand, because this is a hard dough), gradually add the eggs, sugar, and vanilla; mix until creamed. Add the flour, baking powder, and salt. Mix the dough until smooth.

Using a wooden spoon, or better - dig in with your hands - mix in the pistachios and candied orange peel until evenly distributed.

Put the dough on a lightly floured surface and cut in half. Roll each half into a log, each 12 inches long by 1-inch high. Place the logs on a parchment paper lined cookie sheet and bake for 35 minutes or until the bottoms are lightly brown.

Let the logs cool for 5 minutes and then place on a cutting board. Slice each log on a diagonal into 1-inch thick pieces. Put the biscotti back on the cookie sheet and bake 5 minutes. Turn the cookies over and bake the other side for another 5 minutes. Store the biscotti in an airtight container.


Sunday, December 13, 2020

Taralli


Taralli  (also called ciambelle) are chewy, anise flavored bread rings. In Southern Italy they are treats typically made for Christmas and Easter. They can be finished plain, like here, or with icing and colorful sprinkles.  Because they are handmade, they don't need to be perfect, in fact, their irregular rustic look is part of their charm. Have them with breakfast or a between meal snack, with a cup of espresso or with a glass of wine before dinner. Initially they will be crunchy, but become more chewy after a few days. Store in an airtight container. 

Give them out to friends for Christmas and Easter treats! 

This recipe makes about thirty 3" diameter taralli - 

1 cup of warm water
1/2 cup white wine
6 Cups all purpose flour
1 packet active dry yeast
3/4 cup sugar
3  tbs. olive oil
2 tsp salt
2 tbs fennel seeds

Pour the cup of warm water into a glass bowl or large measuring cup. Add the yeast and dissolve in the water. Add the sugar, olive oil and wine and let sit until bubbly. Add the salt. 

Put the flour in a large mixing bowl (or if you want to do it old school, mound the flour on the kitchen counter and make a depression in the center). Slowly add the yeast water into the center mixing it into the flour with a fork or spatula while adding the fennel seeds.

Continue to add the yeast water until you have a workable mixture. The dough should be fairly firm at this point but still pliable. Knead the dough until smooth, then cover loosely with plastic wrap and let stand for 1 hour for a short rise.

Preheat oven to 350 degrees F. Cut dough into pieces a little larger than the size of a ping pong ball, then roll out each piece into a rope, about the thickness of your finger about 6-7 inches long. Form into a doughnut like shape, pinching the ends together.

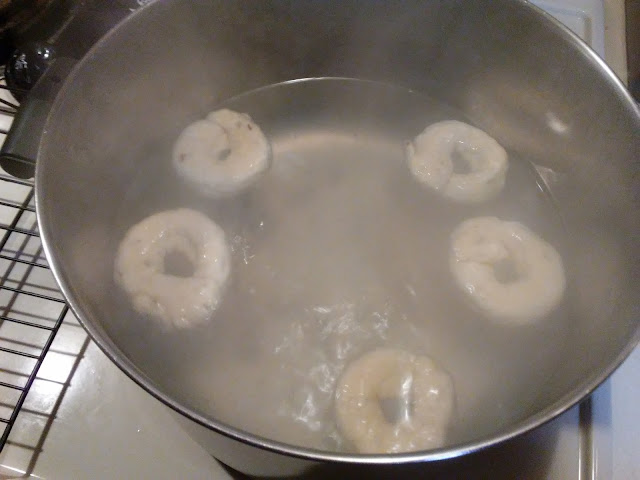
Meanwhile bring water to a boil water in a sauce pot.


Drop 4 - 5 dough rings into the water at a time. When they rise to the top, in about 3 minutes, remove with a strainer and place on towels to dry. 

Place the taralli on cookie sheets in the middle of the oven. Bake for about 15 minutes on each side or until a medium golden color. 


Remove, and cool. Store in an airtight container for up to a month (but they'll be gone way before that) or freeze for up to 6 months.

Friday, December 4, 2020

How to Roast Chestnuts the Right Way

If you like chestnuts, you have surely tried roasting them yourself probably with mixed results. Here is an interesting article by Gabriella Vigoreaux with her take on how to roast chestnuts - the right way - based on Dan Roman's "Buttery Roasted Chestnuts in Foil" from the December 2012 issue of Bon Appetit magazine - 
    
 Enjoy!

If you've been spreading your chestnuts across a baking sheet to roast them, you're doing it ALL WRONG. You see, what chestnuts really need to open up is steam. Keeping them warm just until you peel them is also key. Here are some tips for roasted chestnut perfection every time. 

Don't forget the X!  Chestnuts roasting on an open fire...You know the song. Sadly, the closest many of us have ever gotten to roasting chestnuts on an open fire is sticking them in the oven. You know the drill. You cut the X's into the shell, roast them, and then you have to quickly peel off the skins while they're hot (inevitably burning your fingers along the way).

Even if you're lucky, you only have a 75% success rate, since many stubborn chestnuts refuse to slip from their skins once cooled. After many personal chestnut roasting fails, I have resorted to just buying them from the street carts of Manhattan. That is until recently, when I discovered a foolproof way to get it right, every single time. Read on to see how it's done: lay the chestnuts flat side down on a cutting board. Use a small paring knife, score an X through the skin on the rounded side of each chestnut. 

Soak 'em! Once you've scored them all, place the chestnuts in a bowl of hot water for 1 minute. This will help them steam in the oven. Drain and pat the chestnuts dry. If you want to add herbs or flavorings, this is the time. Toss the chestnuts in a bowl with a combo of melted butter, rosemary, sea salt, or any other combo of fat, herb, and salt.
Wrap them up! Tear a generous length of of aluminum foil and place the chestnuts in a single layer. Gather up the edges to form a parcel with a small opening on top (while still keeping them in a single layer). Place the parcel on a baking sheet. You can stack multiple parcels on one baking sheet if you need to. 
Work quickly! Bake at 425°F until the edges of the chestnut shells really curl up, 25 to 30 minutes. Remove the baking sheet from the oven and working one parcel at a time, peel off the shell and the skin at the X. (A paring knife sometimes makes this job easier). Do this as SOON as they are cool enough to handle; the shells are harder to peel when cold. Don't open up a parcel until you are ready to peel the chestnuts. Eat the chestnuts right away or store them in the fridge for up to 3 days for soups, gnocchi, and snacking.