Sunday, July 19, 2015

Making Grape Marmalade and Grape Liqueur

We grow three different types of grapes - Norton wine grapes and red and white Concord grapes. Our Nortons have ripened in a very odd way this season. They have produced more grapes than in past years but some berry clusters have ripened early and others are still very green. So, sadly, since we have only four vines and not enough are ripening at the same time to harvest enough of them to make a decent amount of wine, we are going to try something a little different this year and make grape marmalade and grape liqueur with them. 

For information on Norton wine grapes and their interesting back story - 


Here is how we made the marmalade. It has a delicious earthy sweet berry tartness and rich deep dark red maroon color - just like a good Norton wine! We used Norton grapes because we grow them but you can use Concord grapes which are more available and are a slip skin grape.

Procedure - for 3 cups of skinned grapes

Step 1 - Grow some grapes

Step 2 - Harvest the grapes - we cut what was ripe enough to use, without knowing what the end amount would be. It came to a little over 3 cups of skinned grapes. 

Step 3 - Wash the grapes while still attached in clusters.

Step 4 - Pull the grapes off their stems and discard any unripe or problem grapes. Place the rest in a colander.

Step 5 - Nortons are a slip skin type grape, as are concords, so skins are easily removed by pinching one side of the grape and gently squeezing, the inside with the seeds will pop out the opposite side. Place the skinned grapes in a skillet or pot. Put the skins in a bowl.
Skins on the left, nude grapes on the right
Step 6 - Put the grape skins in a food processor with a little water and process until they form a smooth slush.

Step 7 - Meanwhile add 1/2 cup of  water to the skinned grapes in the skillet. Bring to a boil for 5 minutes. Remove from the heat and let cool.

Step 8 - Pour the cooled grapes into a mesh sieve over a bowl and press down mashing with a spoon so the juice separates from the seeds. Discard the seeds.
Grape seeds to be discarded
Step 8 - Combine the skins and the grape juice in the skillet with 1/2 cup of water. Bring to a boil and stir in a packet of Sure Jell. Add 3 cups of sugar (1 to 1 ratio of sugar to skinned grapes) stir continuously for one minute. Take off heat and let cool for 10 minutes

Step 9 - Ladle into sanitized canning jars and add lids and rings
Step 10 - Place them in a large pot with enough water to cover by an inch and boil for 10 minutes.  Remove and let cool.

Step 11 - Enjoy


____________________________________________

Making Norton Grape Liqueur

General instructions - 

3 lb. fresh ripe grapes
9 cups 80-proof vodka (or 4.5 cups pure grain alcohol + 4.5 cups water)
Granulated sugar

Rinse the grapes.
Pull each grape off its stem cluster, pinching each grape as you do so, just enough to split the skin. This will allow the color and taste to infuse better into the alcohol. 
Put them into a container that can be weighed easily. An inexpensive food scale works well here.
Dump the grapes into a sanitized glass container, we used a screw top gallon jug.
Add the vodka.
Cap and store in a cool, dark place, stir once a week for 2 - 4 weeks.
Strain through mesh sieve into a new container and note the amount.
In this ratio - for each 3 cups of unsweetened liqueur add 1 1/4 cup granulated sugar.
Let age for at least three months.
Carefully pour the clear liqueur through cheese cloth into individual smaller bottles and cap. Taste and add more sugar if necessary.

Note: Save and freeze the grapes spent to make the liqueur. They can be used in desserts. Mix with sugar and use with ice-cream or on top of pound cake, etc.

Our process - 

We harvested all the Norton grapes that looked ripe enough to use. Our grapes cleaned, came to 3 1/2 pounds. 
Pinch each berry open as you pull them off their stems. Then weigh them. We have a simple food scale we use. Each cupful came to 8 oz. It is important to get the exact weight so you can determine the correct amount of alcohol and sugar to add later.
Put the grapes in a sanitized glass jug.
We used 100 proof vodka, added 7 cups plus a little water.

Day 1 - Kind of a murky gray.... Not very appetizing.
Day 2 - After just one day, the color has changed to a nice red maroon. The grapes are turning pale as the color bleeds out into the alcohol. The color should get richer over time.


Saturday, July 18, 2015

Eggplant With Uncooked Tomato Sauce and Pecorino Cheese

See, this is why you should have a vegetable garden, or at least grow a couple tomato plants, a couple eggplants and some basil in containers. We are fortunate to have a nice flat back yard that gets a lot of sun. This time of year here in Georgia so many herbs and vegetables are getting to their peak of flavor ready to be picked. Pulled three nice black beauty eggplants and three Cherokee purple tomatoes out of the garden this morning with the idea of using them to make eggplant parmigiana. I love eggplant but too many "eggplant parmesan" dishes are heavy, gloppy tomato-ey, cheesy messes. I wanted the eggplant to stand out and the tomatoes and cheese simply condiments for it. This dish is based on a recipe in the book - Franny's Simple Seasonal Italian (thanks again Brittany!). But I made a few changes, deciding to use an uncooked raw tomato sauce instead of cooked and Pecorino Romano cheese instead of mozzarella or parmesan.  
This really turned out great. The eggplant slices were nice and crisp and a little al dente. The simple raw tomato sauce was very aromatic with the individual ingredients keeping their identity.  You could clearly smell and taste the separate components - the sweet/tart Cherokee purple tomatoes, the lemony fresh basil, the pungent raw garlic, the background heat from the Calabrese pepper and the grassy olive oil. The salty pecorino cheese was perfect shaved on top. And on the side, savory grilled Italian sausage and sliced melon. Yah!


Black Beauty Eggplants

Meaty Cherokee Purple tomatoes

Fresh Basil and a hot Calabrese pepper


For the uncooked tomato sauce:
Make sure to get the freshest ingredients possible. You won't be disappointed. Don't even try this with pale supermarket tomatoes. If you don't grow your own tomatoes and basil, wait until you can find some heirloom tomatoes and good basil at a farmers market. This will be your go-to pasta sauce for special occasions every summer. 

3 ripe home grown or heirloom tomatoes finely chopped. (Let their juices go into the sauce too.)
3 large garlic cloves finely chopped, not minced
1 nice handful of fresh basil hand torn into small pieces
1/2 cup of a good quality extra virgin olive oil
Optional - small hot chili pepper finely chopped
Pinch of salt and pepper

Combine the tomatoes, garlic, salt and pepper (and hot pepper if using) in a bowl. Pour in the olive oil and then the basil. Make this several hours ahead of when you are going to use it. Cover with plastic wrap and let it stand at room temperature so the flavors can mingle and develop. Stir every now and then and taste. Do not refrigerate


Slice the eggplants lengthwise into 1/4 inch pieces

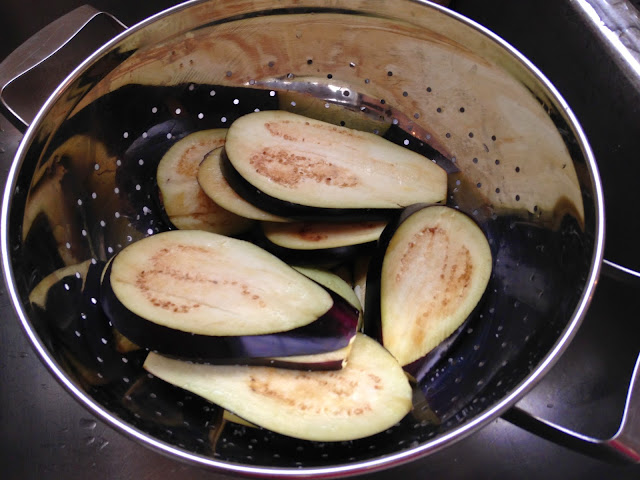
Sprinkle with salt and let sit in a colander for about half an hour. Then wash off and blot dry.

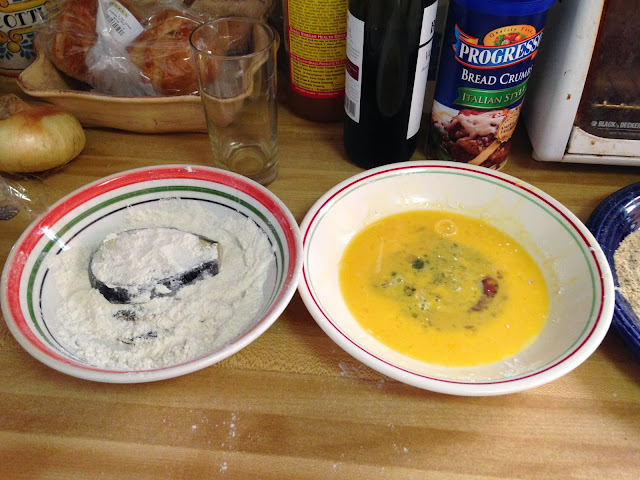
Dredge each piece in flour and shake off excess, then dip in beaten eggs.

And then into breadcrumbs.  I used Progresso but you could use panko or make your own. Don't over bread, though, it will just come off in the oil and burn.


Pan fry the eggplant on medium high heat until browned about 3 min per side. Use inexpensive supermarket store brand extra virgin for pan frying the eggplant here. It will still give a good olive flavor. Save your better olive oil for other purposes, like the tomato sauce above. 

Spoon out a thin later of the tomato sauce on each plate.


Divide up the eggplant slices and spoon a little of the sauce over each piece, shave some Pecorino Romano cheese over top and a few basil leaves. 

Serve up a link of grilled Italian sausage on the side and some sliced melon.


Wednesday, July 1, 2015

Purple Hull Peas With Pancetta, Onions and Thyme

We love purple hull peas and they are in season right now. Sauteing them with pancetta, onions and thyme is our favorite way to prepare them. It brings out their inherent sweetness. Serve them along side roast chicken or grilled pork chops.

Purple Hull Peas with Pancetta, Onions and Thyme

1/8 lb pancetta (or 2 thick slices of bacon) diced
1/2 sweet onion, diced
1 large cloves garlic, finely chopped
Half of a 14-oz. can chicken stock
2 cups fresh shelled purple hull peas (about a pound and a half unshelled)
3 sprigs fresh thyme – we like lemon thyme
Freshly ground pepper and salt to taste – salt only at the end.
 
Sauté the pancetta in a sauté pan. (If using bacon, fry until crisp.)  
Remove pancetta or bacon and pour off rendered fat, leaving 1 tablespoon in pan.  
Slowly sauté onions in the pan, stirring frequently, until they are well browned and caramelized. 
Remove onions and set aside.  
Next, sauté garlic in pan (adding rendered fat or oil if necessary) just until it sizzles.  
Deglaze pan with chicken stock, scraping up brown bits that cling to the bottom and
Stir them into stock.  
Add peas and thyme sprigs. Broth should just cover peas. If not, add additional broth or water to cover.Cover pan and simmer on low heat until peas are tender, 15 to 20 minutes.  
Add the pancetta and caramelized onions to peas just before serving, along with a generous grinding of black pepper. Stir together. Add salt to taste.  
Makes 4 servings.