Tuesday, October 6, 2020

Pasta with Pistachios


We recently had dinner at Hoffstot's CafĂ© Monaco here in Oakmont. Lisa ordered their Pasta Pistachio. It was so good that we decided to try to recreate it at home. Their menu describes the dish like this - 

"This simple dish is a chef’s favorite. Imported fusilli pasta tossed in butter with garlic, basil, oregano, fresh tomatoes and spinach then topped with toasted pistachios and Parmigiano-Reggiano cheese".

These are the original key flavor ingredients- Pistachios, Garlic, Tomatoes, Basil, Oregano, Spinach, Parmigiano-Reggiano Cheese

The dish was delicious as is but we wanted to make two changes right off the top: 

1) They used whole pistachios but we thought it would be better if it were a mix of whole pistachios and roughly chopped pistachios. 

2) They used fusilli but we felt a different type of pasta such as mezzi rigatoni would hold the nuts and other ingredients better and help prevent the bigger pieces from all ending up on the bottom of the pasta bowl.

But the more we thought about it, we came up with other ways to do a pistachio and pasta dish without getting too carried away. Like mixing all the original ingredients into ricotta and stuffing that into large shells or into pacheri (a short wide tubular pasta). Maybe do the original 7 ingredients but in a cream sauce or add crisped up pancetta as an additional ingredient

We finally settled on these ingredients - 

1 box Mezzi Rigatoni
1 cup Shelled Pistachios - chop half of them and leave half whole
1 pint multi colored Grape Tomatoes
1 Red or Orange sweet bell pepper - cut in thin ribbons
Half and Half - 1 1/2 cups
1/2 cup grated Pecorino cheese plus more for 
5 cloves Garlic - minced
Arugula - hand full
Good big handful fresh Basil
Oregano - 1 tablespoon fresh or 1 teaspoon dry
Fresh Hot Chili Pepper - 1/2 teaspoon minced or more to taste (optional)
Salt and Pepper to taste

How to - 

Bring a big pot of water to boil for the pasta. Add a tablespoon of salt and stir. 

In a medium sized frying pan on medium heat saute the garlic in olive oil for a 3-4minutes.

Add the pistachios and stir together.

Add the oregano, chili pepper and sweet peppers. Saute for another 3-4 minutes

Meanwhile drop the Rigatoni in the pasta pot.

Add the tomatoes to the pan with the pistachios and peppers. Add the Half and Half and Pecorino cheese. Stir everything together, salt and pepper to taste and cook to thicken.

When the rigatoni is done, drain and put in a large serving bowl, then add the ingredients in the pan along with the basil and arugula and stir everything together. It's important to add the basil at the end to keep it's flavor strong.

Put this delicious stuff in pasta bowls and top with grated pecorino cheese. 
Dig in and enjoy!!!

Fancy Pants Mussels Rockefeller

You've heard of Oysters Rockefeller. This is their cousin Mussels Rockefeller. We love mussels and were planning to have them this past Friday our favorite way - steamed in a wine and herb broth and served over linguine but Lisa said "Hey, babe, let's change things up. I've found a cool recipe for mussels Rockefeller maybe we can play around with the recipe and have them that way." I replied, "Why not?" And so we did and lived happily ever after.... Wait, that's another story. I'll save for another time. 😄

Typically oysters Rockefeller are prepared by mixing together breadcrumbs, garlic, herbs, some kind of green - usually spinach, and butter and topping oysters on the half shell with that mix and baking or broiling them.

Mussels Rockefeller is done the same way but with a little different, and necessary, prep twist that we discovered pretty quickly. Like oysters, mussels don't like to have their shells pried open. Oyster shells are much harder than mussel shells, but with a little practice, you can easily pry open raw oyster shells at their hinge with a shucking knife without damaging the oyster inside. But mussel shells are delicate and if you try to pop the shell open at the hinge you will just end up cracking or breaking it and destroying the mussel meat in the process. What you have to do is "coax" the mussels into opening their shells by themselves. How do you do that? By heating some water in a pan to just boiling and tossing the tightly closed mussels in. About 5 - 10 seconds later the mussels will have opened up on their own. Then fish them all out with a strainer. The shell can easily be snapped apart leaving the mussel meat on the other half ready to be filled with the delicious breadcrumb herb topping.

The ingredients in the topping we made - for 2 dozen mussels (about two pounds) -

Garlic - 3 cloves minced
Olive oil
Fresh Thyme - 1 tablespoon finely chopped
Fresh Flat Leaf Parsley - 1 tablespoon finely chopped
Red pepper flakes - to taste
Splash of white wine
Bread crumbs - 2 cups
Butter - 3 tablespoons
Salt and Pepper to taste

In a small frying pan, sautĂ© the garlic in a little olive oil until just translucent, add a splash of white wine and turn down the heat to simmer, stir in the herbs, salt and pepper and bread crumbs. Stir regularly until the bread crumb mixture gets toasty. Remove from the heat and add the butter. 

After taking the shells apart by the method above, place the half shell mussels on a foil lined baking sheet. Top each mussel with about a teaspoon of the bread crumb mixture


Move the oven rack to the top of the oven and bake at 425 F for 3-4 minutes. Turn off the oven and turn on the broiler. Broil for just a minute to put an extra crunch in the bread crumbs.

Remove from the oven and hit each one with a spritz of lemon juice. Enjoy!

We served these with a side of arugula, basmati rice and mandarin orange sections.


Planting a Fall Vegetable Garden

We like to keep our vegetable garden areas going through the fall. 

Here is a link to an article on Gardenality, a gardening web site with some great tips and info on planning, planting and maintaining a fall garden.

Sunday, August 2, 2020

Okra and Green Tomato Fritters

We really like these! Here we are in the middle of summer. Our garden this year has been pretty beaten down by the heat. The tomatoes are looking tired and haven't ripened. We are in western Pennsylvania though... But, the okra, of all things, is doing OK. In looking for different ways to use okra, I came across a post on SouthernBite.com about okra and green tomato fritters. We decided we had to try making them. We tweaked the recipe a little and this is what we came up with - 

Makes 12 -15 fritters

Ingredients
1/2 pound okra, coarsely chopped
1 large green tomato, or three or four small, diced
1/2 sweet onion, finely diced
1/2 cup all-purpose flour
1 cup self-rising cornmeal
1 large egg
1/2 cup buttermilk
1/2 teaspoon salt
1/2 teaspoon black pepper
A sprinkle of garlic powder
1 tablespoon fresh basil leaves chopped
1 tsp minced fresh chili pepper
1/3 cup vegetable oil for frying
YUM-YUM sauce for dipping - Optional but worth it! Look for it in the Asian food section or make your own - https://www.smalltownwoman.com/yum-yum-sauce-japanese-hibachi-style/


Instructions

In a large bowl, combine the flour, cornmeal, salt, pepper and garlic powder. Add the chopped okra, diced green tomato, minced onion, chili pepper and basil. 


In a small bowl, lightly beat the egg into the buttermilk, and then add it to the okra mixture.


Heat the oil in a large skillet over medium heat. Drop the okra batter into the oil by heaping spoonfuls. 
Cook 4 to 5 minutes, then flip the fritters and press them flat with the back of a spatula. 
Cook 4 to 5 more minutes or until crispy and golden brown. 
Cook in batches, adding more oil if necessary; then drain on paper towels, and serve hot.


YUM YUM sauce - 

Saturday, July 18, 2020

Grilled Flank Steak with Roasted Cherry Tomatoes


Yummmmmm! Flank steak marinated over night with a mix of citrus, herbs and heat, then grilled to perfection and topped with roasted heirloom cherry tomatoes. Yes, YUMMMMMMMM!

Flank steak and it's "cousin" skirt steak are relatively inexpensive cuts of beef that can be tough and disappointing if not treated right but wonderful if prepared with care and cooked correctly and served up with thoughtfulness. They both take well to marinating and grilling.


Put the skirt steak into a glass casserole marinade dish.

Whisk orange juice, lime juice, olive oil, garlic, salt, cumin, pepper, oregano, and cayenne pepper together in a large bowl. Place skirt steak pieces, 1 at a time, into the marinade to thoroughly coat them. Add sliced onions and toss with the meat.

Transfer mixture and marinade to a re-sealable plastic bag. Squeeze out air, seal bag, and place on a dish. Refrigerate over night.

Transfer pieces of meat onto paper towel-lined rimmed sheet pan to drain for a couple of minutes.

Cook over hot coals. Grill first side 3 to 4 minutes. Turn and grill second side 2 -3 minutes, Transfer to a plate and allow meat to rest a few minutes.

Slice into 1/2-inch slices and arrange on a serving plate. Spoon accumulated juices over the meat. Drizzle with olive oil and sprinkle with coarse salt and chopped cilantro and spoon on roasted cherry tomatoes. Serve with lime wedges.

Monday, July 13, 2020

Bacon, Arugula and Peach Sandwiches with Basil Mayonnaise


Who doesn't like a good BLT - Bacon Lettuce and Tomato sandwich? Well since it's summer and sweet slurping peaches are in season, homegrown peppery arugula and aromatic basil are in season and bacon is always in season, why not do a little change up on a traditional BLT and make a BAP - Bacon Arugula and Peach sandwich and instead of plain ole mayo, punch it up with a little basil? The savory bacon, the sweet peaches, the peppery bitterness of the arugula, the lemony basil mayo and yes the crunch of the toast! These are so good and light on a hot summer day for dinner with a big COLD glass lemony ice tea! 

BAP's are so simple to make that I'm not even going to give a whole recipe just a sketchy "how to" with photos from our very own test kitchen.

We are fortunate to have a nice garden and grow basil and arugula - but not peaches because of those damn thieving squerls! But all these ingredients are available in every supermarket.


Arugula and sliced peaches -

Homegrown arugula -

For the basil mayonnaise - basic amount (good in chicken salad too...)
1/2 cup Hellmann's REAL Mayonnaise (do not even think about using Miracle Whip)
1/2 cup chopped fresh basil
A squeeze or two of lemon juice
Drizzle of Extra Virgin Olive oil
Salt and pepper to taste

Combine  together and refrigerate

The bacon and arugula and the basil mayonnaise -


Add the sliced peaches -

We like this on toasted multi grain bread -

Tuesday, July 7, 2020

Focaccia

We never had or even heard of focaccia growing up in our house but then again the Italian side of my family came from southern Italy and then again focaccia, while around for a LONG time in Italy, never made it big here in the US until some trendy foodies "discovered" it and got other foodies on board, then it became a "thing" here like ciabatta. But don't get me wrong, I'm not disparaging focaccia in any way. We really like it and have made it many times over the years or at least since the mid 1990's when we got Carol Fields book - Focaccia, Simple Breads from the Italian Oven. 
Most cultures have flat breads of one kind or another like naan, pita, tortillas, roti, chepati, matzo and, of course, focaccia's cousin - pizza. Flat bread is just that - flat, not formed into a loaf and typically less that 2 " thick. Focaccia has it's roots in the Liguria region in northern Italy. It can be rather plain, topped simply with olive oil and sea salt or studded with pieces of cured meats like pancetta or salami or herbs like rosemary or sage or vegetables like sweet peppers or caramelized onions or even sweet with sliced fruits or berries and dusted with sugar. Unlike other kinds of flat breads that are used as wraps or pockets to hold meats, cheeses, vegetables or sauces, focaccia is eaten simply as it is out of hand crispy,  chewy and flavorful.. 
The focaccia we usually make is simply flavored with white wine, rosemary, olive oil and sea salt. It is not complicated but it does require a little time and attention but what home made bread doesn't, and it is worth it!


Ingredients -

Sponge
2 1/2 tsp active dry yeast (1 package)
2/3 cup warm water (105 - 115 degrees F)
1 cup unbleached all-purpose flour

Dough
1/2 cup water room temp
1/3 cup dry white wine, we like Pinot Grigio
1/3 cup Extra Virgin Olive Oil
The Sponge, from above
2 1/2 cups plus 2 tsp (360 grams) unbleached all-purpose flour, plus up to 2 tablespoons as needed
2 tsp sea salt

Topping
About 2 tablespoons extra virgin olive oil
2 - 3  x 4" long twigs of rosemary
1 tsp sea salt

Other things you might need - pizza stone, cooling rack, spray bottle

To make the sponge
Making a sponge is just a way of getting the yeast started. Sprinkle the yeast over the warm water in a large mixing bowl. Wisk it in and let stand until creamy, about 10 minutes. 

Stir in the flour and beat until smooth. Cover tightly with plastic wrap and let rise until puffy and bubbling, about 30 minutes.

To make the dough: 
Add the water, wine, and olive oil to the sponge. Whisk in 1 cup of flour plus the salt first, then beat in the rest of the flour until you have a dough that is very soft and very sticky. 

Turn the dough out onto a floured board or a counter top and with the help of a dough scraper, knead for 6 - 8 minutes pushing, pulling and flipping the wet dough with the scraper. Add up to 2 tablespoons of flour if the dough is too wet and difficult to work with. The dough should be soft but not wet.

First rise: 
Place the dough in a lightly oiled container. Cover it tightly with plastic wrap and let rise until doubles, about 1 hour.

Second rise: 
The dough should now be soft, full of air bubbles and stretch easily. Press it out to fill to the edges an oiled 10 1/2" x 15 1/2" pan or a round focaccia pan, as we use. Dimple it well with your fingertips. Don't be afraid to do some good strong dimpling. Cover with a kitchen towel and let rise until the dough is puffy and doubles, about 45  minutes.

Baking: 
At least 30 minutes before you plan to bake, preheat the oven to 425 F. If you have a baking stone, put it in the oven at this time. 
Strip the leaves off the rosemary twigs and sprinkle over the surface of the dough, then again dimple the dough and add olive oil over the surface until it pools in the dimple marks. Sprinkle the sea salt over the top. 


Place the focaccia pan directly on the stone, or on the oven rack if you don't have a pizza stone, and immediately reduce the oven temp to 400 F. Spray the oven floor and walls with water from a spray bottle 3 times during the first 10 minutes of baking. Bake for 25 - 30 minutes until golden. Immediately remove from the pan and let cool on a rack. Serve warm or at room temp. ENJOY!


Sunday, June 28, 2020

Garlic's Up!

Move beyond "supermarket garlic" - Grow your own!
Our herb garden. There should always be a stand of garlic (back center) in everyone's garden!
Garlic, is the go-to herb for so many dishes in so many different cultures. It is something both omnivores and vegetarians can agree on. Garlic brings its distinctive flavor, earthy aroma and subtle nuances to anything you use it with, giving wonderful character and depth of flavor to meats, seafood, vegetables, sauces, marinades, rubs, dressings, oil infusions, soups, stocks and stews, you name it. It is pungent when raw, mellow when cooked and rich and nutty when roasted and caramelized. It can be sweet and delicate or bold and lusty - it all depends on how it's treated, capice?

And, let's not forget it's health benefits. Whole books have been written about garlic's health and therapeutic value. Garlic has long been known for its antibacterial and antiviral properties. Studies have also shown that garlic has important cardio-protective properties in the form of blood cell and blood vessel protection from inflammatory and oxidative stress.

So, yes, we LOVE garlic here! For cooking and our health. We've been growing garlic as a staple in our garden for quite a few years, playing with different varieties - there are many, many varieties of garlic, each with it's own flavor "personality". This year we are growing Chesnok Red about 50 heads in all. Here's a little video of our garlic - 
These should be ready to pull in about a month or so. But in the meantime we can use the scapes! That's another cool thing about growing your own garlic - you get to enjoy the scapes.  Scapes are the tall curled flower bearing shoots that pop up in the center of the garlic plant and emerge from the center of the leaves. We snip them off before they become a flower so the garlic plant can devote all its energy to producing bigger garlic heads with more cloves. If you want to grow garlic for the seeds, you can let the scapes mature and flower then collect the seeds. We like to eat the scapes though. They are delicious and can be used just like garlic and they are ready a month or two before the garlic is ready to harvest. They look like this   


Here is a link to a fun article about garlic scapes and how to prepare and enjoy them -


Here is the garlic from back in Georgia a couple years ago


Harvest time!


Garlic hanging in our kitchen
If you love garlic too, or maybe you're a little garlic shy or are just garlic curious, check back on this blog because we will be posting creative ways to use and enjoy garlic as well as tips on growing-your-own. 

Here is a link to our favorite source for garlic planting stock =  The Garlic Store

They have a great variety of hard neck and soft neck garlic varieties with helpful descriptions of their taste and flavor. They are a one-stop garlic shop for growers, gourmets, gardeners, garlic Lovers, and garlic gifts! 

Tuesday, June 16, 2020

Colatura di Alici

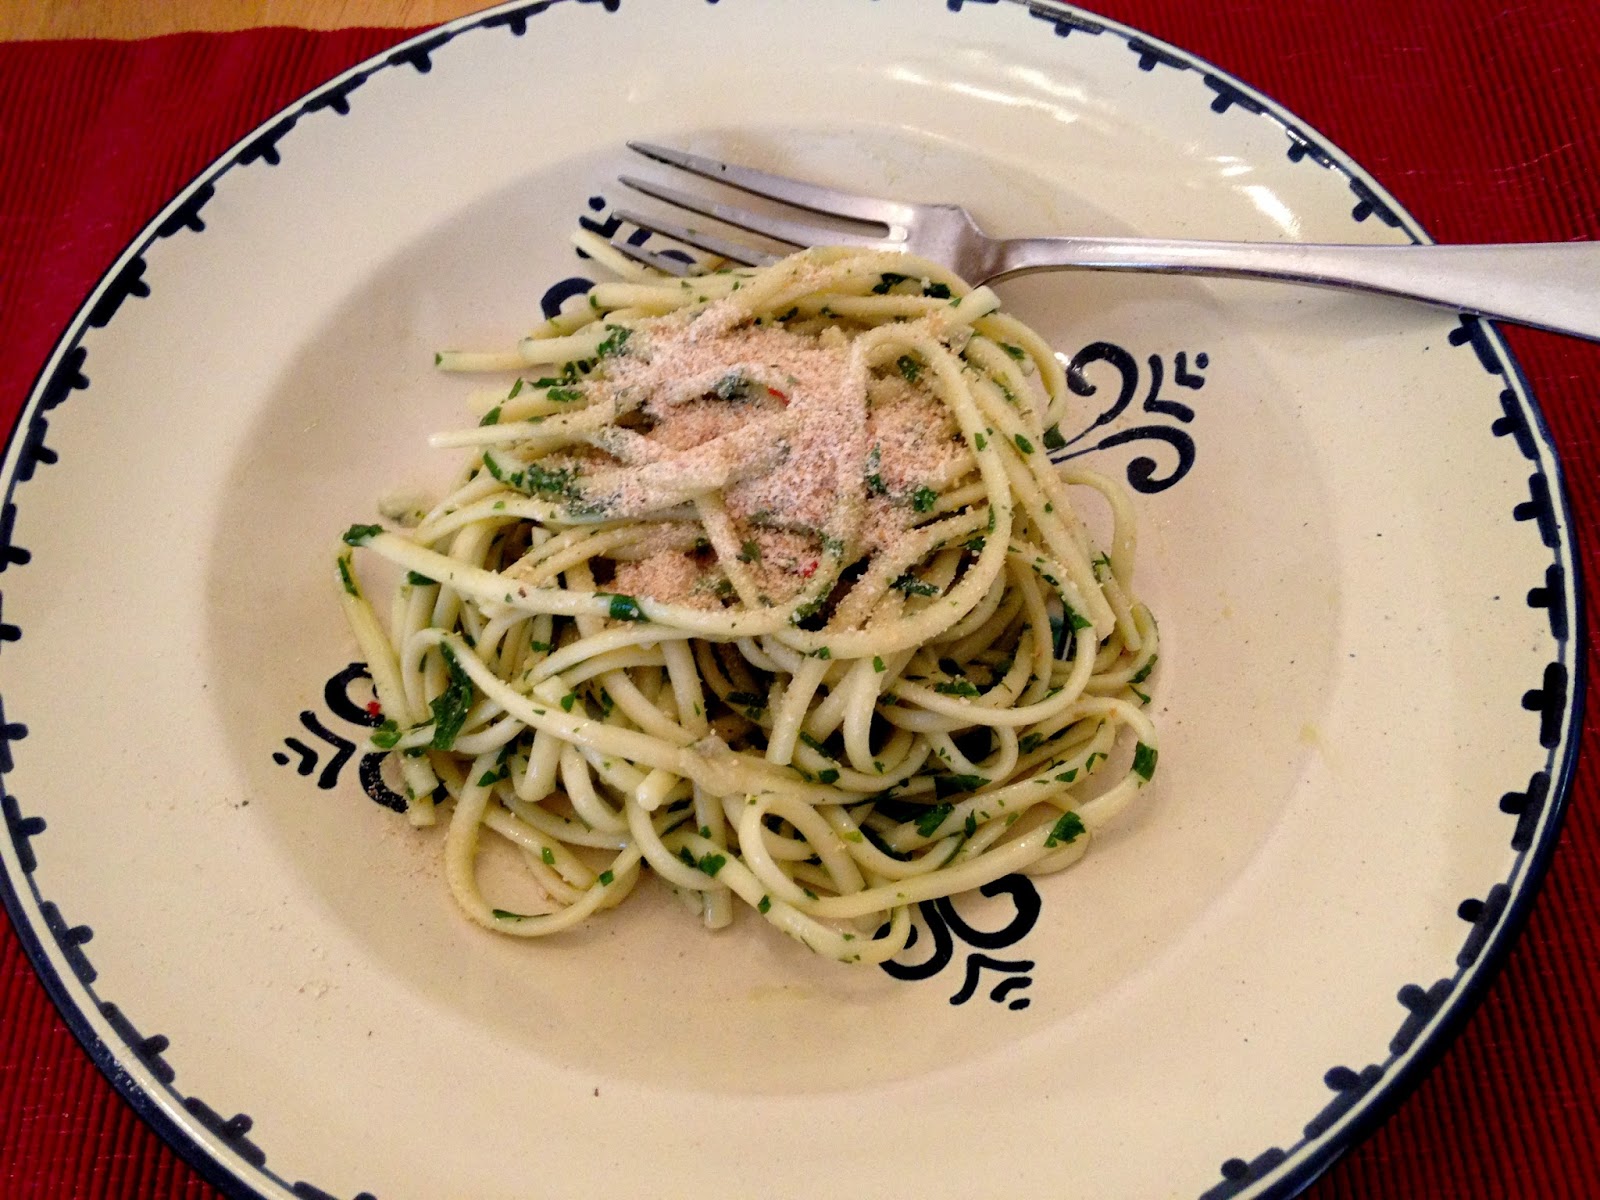
This looks like a simple bowl of spaghetti with garlic and olive oil doesn't it? This one is a little different though, because it has a wonderful added ingredient - colatura di alici. Colatura di alici is what you might call 'liquid essence of anchovy'. It is a fish sauce made using an ancient process dating back to the days of the Roman Empire. The Romans called it garum and it was used as a seasoning in most things they ate. Fresh caught anchovies are cured with salt inside barrels for forty days. The liquid is then strained off and aged again in wooden barrels for upwards of a year, then bottled. This amazing liquid is used to dress pasta, salads, fish, roast chicken, cooked vegetables. As you might expect, it is quite salty and has a strong aroma that thankfully - almost magically - changes when added to food to give it an exotic richness. A little goes a long way. You can order colatura online from Italian specialty food sites or from Amazon. Don't be afraid of it!

Here is a video showing the method I wanted to use as a guide but made a few adjustments. See my notes below using less colatura and adding a little lemon juice and lemon zest and sauteing the garlic.


Ingredients:
1 pound linguine or spaghetti
1+ teaspoon  colatura 
1 tablespoon freshly squeezed lemon juice and zest from 1 lemon
2 cloves of garlic sliced very thin
Crushed red chili pepper flakes, to taste
Freshly ground black pepper to taste
5 tablespoons extra virgin olive oil, divided
1/2 cup minced fresh flat leaf parsley
Toasted plain breadcrumbs

In a frying pan with medium heat saute the garlic in 2 tablespoons of the olive oil for 2 - 3 minutes, just enough to take the edge off.

Cook pasta in UNSALTED boiling water according to package directions until al dente.

Meanwhile, in a large bowl, combine colatura, lemon juice, garlic, chili pepper and black pepper. Add a little cold water and whisk vigorously to emulsify.

Drain pasta, and add it to bowl, tossing well.

Drizzle in a little more olive oil and more parsley, toss to combine, and taste. Then say Wow!

Sprinkle with toasted breadcrumbs but DO NOT TOP WITH GRATED CHEESE

Serve warm or at room temperature.

Sunday, February 23, 2020

Roasted Tomato Sauce


This is a simple, easy and very tasty sauce. Tomatoes develop a wonderful rich flavor when they are roasted to the point of blistering or even get a little char on them. Serve this thick chunky sauce simply as it is over pasta or add a side of meatballs, pancetta or sausage. We like just the roasted tomatoes over pasta with nothing more than a nice hit of a good high grade olive oil and a sprinkle of pecorino cheese. 

This also makes a great bruschetta topping on grilled country bread.

Ingredients - 

2 lbs of ripe homegrown or multi colored cherry, grape or heirloom tomatoes
5-7 cloves of garlic – chopped
Rosemary – 2 sprigs, leaves pulled off and roughly chopped
Zest from one lemon
Salt and Pepper to taste
1/3 cup+ Extra virgin olive oil 
Freshly Grated Pecorino Cheese
Pasta of your choice. We like this with long fusilli

If you are using good ripe homegrown tomatoes, cut them into 1½ inch chunks. If using Roma tomatoes, cut them into quarters lengthwise.If using grape of cherry tomatoes, leave them whole

Put them in a rectangular casserole dish with the garlic, rosemary, lemon zest and salt and pepper.

Pour about 1/3 of a cup of extra virgin olive oil over the tomato mixture and stir together.
Bake at 410 degrees for 45 minutes uncovered.


Every 10 minutes, take the sauce out of the oven and stir the tomatoes.


You want the tomatoes to get blistered and collapse but not dried out, so keep an eye on them. Add  a little water and olive oil if needed.

When done, stir it again and serve over pasta with the grated cheese. You can also dump the roasted tomatoes into a bowl and use an immersion blender to adjust how chunky you want your sauce to be. 

You can also play with the ingredients and use oregano instead of rosemary, use more or less garlic, or fresh basil. If you use fresh basil, don’t add it until the sauce is out of the oven. 


Did a complete scarpetta!  Look it up :)

Monday, January 27, 2020

Spaghetti with Puttanesca Sauce


Puttanesca Sauce is one of our very favorite pasta sauces. Tradition has it originating in Naples but Calabria also claims it. Either way, the ingredients are definitely Southern Italian, combining tomatoes with anchovies, garlic, olives, capers, hot peppers and oregano. The flavor is complex, sensual and seductive.Supposedly it is has aphrodisiac properties. Salsa Puttanesca literally means "prostitute’s sauce". Maybe that’s the connection. It’s quick and easy to make. If you have never had it, I'm sure once you try it, it will become one of your favorite pasta sauces too.

Ingredients -

1/3 cup extra virgin olive oi
5 anchovy fillets - chopped
5 nice sized cloves of garlic – minced
hot red pepper flakes - enough to make it interesting but don’t over due it         
2  Pints grape tomatoes
1 tablespoon fresh oregano - chopped  or 1 tsp dry
1 handful fresh flat leaf parsley - chopped
2 tablespoons large capers preferably in salt (rinsed)
15 black olives (Kalamata are the best) - pitted and cut in half
salt – just a little because the other ingredients are salty 
1 box spaghetti or linguine                        

Procedure -

Put olive oil and anchovies in a large skillet and cook over medium-low heat, stirring with a wooden spoon, until the anchovies dissolve - about 5 min.

Add the garlic and pepper flakes and cook until the garlic just starts to turn color - about 1-2 min - don’t overcook the garlic.

Add the tomatoes, oregano and parsley and a little salt and raise the heat to med-high.  After the tomatoes come to a boil and start to melt down, reduce the heat and simmer covered for about 30-40 min.

Cook the pasta 

When the pasta is almost done, add the capers and olives to the sauce and blend in.

Drain the pasta and toss with the sauce. Drizzle a little olive oil over it. 

Note - Grated cheese is not typically used with this sauce.