Thursday, November 4, 2021

Pan Roasted Chicken With Balsamic and Figs

 
We have a bumper crop of late ripening figs this year on our fig tree. So, as a last hurrah we were looking for different ways to use them up besides making them all into fig preserves. Lisa found a recipe that combined chicken and figs together with flavor seasonings that sounded delicious, and it was. I know you will love it! Here is how she did it in our humble test kitchen - 
Ingredients 

5 or 6 bone-in, skin-on chicken thighs

Salt and pepper

2 tablespoons extra-virgin olive oil

2 tablespoons butter

2 shallots, peeled and finely sliced

4 cloves garlic, peeled and chopped

1 heaping tablespoon fresh thyme leaves off the stem

1 teaspoon red chili flakes

3 tablespoons balsamic vinegar

½ cup chicken stock

¼ cup white wine

1 tablespoon Dijon mustard

1 tablespoon honey

6 to 7 fresh figs, halved

½ lemon, juiced

 Directions 

Preheat oven to 350˚F.

Prep the shallots, garlic and thyme and season the chicken generously with salt and pepper -

Heat the olive oil in a large skillet over medium heat. Add the chicken skin side down and brown on both sides, 5 min per side. Remove chicken from pan and set aside -


Hear the sizzle!


Add butter to skillet and then add the shallots season with salt and pepper and cook over medium stirring often until softened, about 5 min -
  
Add the garlic, thyme, and red chili flakes, stir for 5 minutes. Then stir in the balsamic vinegar, chicken stock, mustard and honey. Simmer for about 5 minutes - 

Chicken stock and white wine -


Place the chicken back into skillet along with the figs. Transfer to oven and cook for 30 minutes or until chicken is fully cooked through. You can broil for the last minute or so for more color on the chicken -

  
Remove from oven and squeeze the lemon over juice and serve with your favorite side. We chose jasmine rice topped with some of the sauce. 


Monday, October 4, 2021

Maple-Mustard Pork Tenderloin with a Cranberry-Port Relish

Sweet and slightly smoky maple syrup is an easy way to add full complex flavor to both sweet and savory dishes. Here it balances the spiciness of the Dijon mustard to make a simple glaze for a lean pork tenderloin. A splash of port wine contributes to a bold sauce punctuated by sweet and sour fresh cranberries and zesty crystalized ginger.

Ingredients

1 pork tenderloin approx. 1  - 1  1/2 lb 
Salt and fresh ground black pepper
1 tablespoon unsalted butter
2 tablespoons pure maple syrup
1 tablespoon Dijon mustard
2 cups fresh cranberries
1/2 cup tawny, ruby port or Marsala wine
1/2 cup sugar
3 tablespoons crystallized ginger - minced

How

Preheat oven to 385 F


Season the tenderloin with salt and pepper.

In a large oven proof frying pan over medium high heat, melt the butter. Add the pork and cook turning occasionally until browned on all sides, about 5 - 8 minutes. Remove rom heat.


For the tenderloin glaze - 


In a small bowl, stir together the maple syrup and the mustard. Spread about half of the sauce on the tenderloin. Put the pan in the preheated oven for 10 minutes. Take out and spread the rest of the sauce over the meat and return to the oven for 10 - 15 more minutes or until the internal temp reaches 165 F.

For the Cranberry relish -

Fresh cranberries

Crystalized ginger

Marsala wine

While the pork is roasting, cook the cranberries, the wine, the sugar and the minced ginger in a heavy bottomed sauce pot. We decided to use Marsala wine, but Port would work just as well. Bring to a boil over medium high heat, stirring often. Reduce the heat to medium and continue to cook uncovered stirring regularly until the berries have popped and the juices are syrupy, about 10 minutes. Then remove from heat. Serve this warm with the pork. This stuff is amazing. You will want to make this at Thanksgiving for sure. It would also be good on chicken or beside fish.

Finished cranberry relish

When the tenderloin is ready, transfer to a carving board and let rest for 5 minutes. Then cut the meat crosswise into 1/2 inch pieces.
The finished roasted tenderloin with maple-mustard glaze

Divide the slices evenly and fan out on the plates. Spoon some of the warm cranberry sauce next to the slices.

We roasted mixed color baby potatoes seasoned with rosemary as a side.


Saturday, October 2, 2021

How to Make Fileja Pasta


Fileja is a traditional handmade egg-less pasta from southern Italy, specifically Calabria where many of my ancestors lived. It has a distinctive look and a shape that traps and holds sauce very well. Because it is a substantial pasta it has a nice chewy bite that goes well with a rich meat sauce. We usually serve them with a slow cooked pork ragu or with chunky roasted tomatoes.

The technique for making fileja involves rolling a piece of pasta dough around a metal or wooden rod or skewer. In Calabrian dialect this pasta making tool is called a dinaculu. I made our dinaculu by snipping off the long side of a wire coat hanger. Credit for that idea goes to Rosetta Costantino in her book My Calabria. It is the perfect tool for making this interesting and versatile pasta. One Christmas I gave sets of them to my kids as stocking stuffers calling them "pasta machines".

There are similar types of pasta in other parts of Italy. In Sicily, they are called busiate. The general term for pasta that is made by rolling the dough around a steel or wooden rod is maccheroni al ferratto - literally maccheroni made on iron.

Here two of the dinaculu I made -


Video on how to make them - 

Proportions for making enough for 4 people as a main dish - 

3 cups of flour - semolina or unbleached all-purpose or a mix of half semolina and half all purpose flour
3/4 cup water (approx)

The amount of water can vary depending on the humidity in your kitchen and the moisture level in your choice of flour. If using all-purpose, we like King Arthur brand.

Mound the flour on a work surface or in a bowl and add the water a little at a time to form a dough. Knead until smooth and allow to rest for 30 minutes wrapped in plastic wrap. 

Rolling is best done on a sturdy smooth surface like a kitchen table or counter top. Dust the surface you will be working on with just a little flour - not too much or the dough won't roll and wrap properly. Pull off a small piece of dough, a little bigger than a marble, and make a short rope with it, about 2-3 inches long and almost 1/2-inch in diameter. Gently push the rod into the pasta lengthwise and at a slight angle. Using only light pressure from your fingertips roll each piece forward away from you and then back again several times, stretching it a little as you go. The dough will wrap itself around the rod to form the fileja. Then slide the pasta off the rod. Repeat with the remaining dough. Lay the fileja out on a towel or sheet to dry for at least 30 minutes to an hour before cooking.

With a little practice you can make dozens of these quickly. And if you are having friends over, pour some wine and let everyone do some rolling. 

You will notice the surface of the pasta has a slight roughness. This is typical of fresh hand made pasta and one of the reasons it's so much better than store bought That roughness helps the sauce adhere and absorb into the pasta.  

Note: Fresh pasta does not take as long to cook as store bought dried. Figure about 5 minutes max in rapidly boiling water for fileja, less if you are adding them to the sauce in the pan to finish cooking. Don't over cook them !

We make these at home regularly where it's a fun group activity. As you can see in this photo, different hands make different variations on the theme. Like snowflakes, no two fileja are the same...


With roasted tomatoes - Letting the fileja, or any type of pasta, finish cooking in the sauce lets the pasta absorb the flavors of the sauce much better than just ladling the sauce over the finished pasta in a bowl.


_________________________________________________

Fileja with a pork ragu


Friday, September 24, 2021

Butternut Squash Fritters


Butternut squash fritters are great fall treat. These things are addictive and easy to make. If you need to make a bigger batch for a party, a picnic or family gathering, use the ratio of ingredients and simply bump up the amounts.

Ingredients - makes 20 fritters
one butternut squash - shredded 
1/2 cup plain bread crumbs
1/2 cup flour
1/2 cup pecorino cheese
1 egg
1/3 cup milk
1 tsp raw sugar
2 tablespoon chopped fresh flat leaf parsley
2 tablespoon chopped fresh basil
salt and pepper
Optional - crushed red pepper flakes to taste


Thursday, September 9, 2021

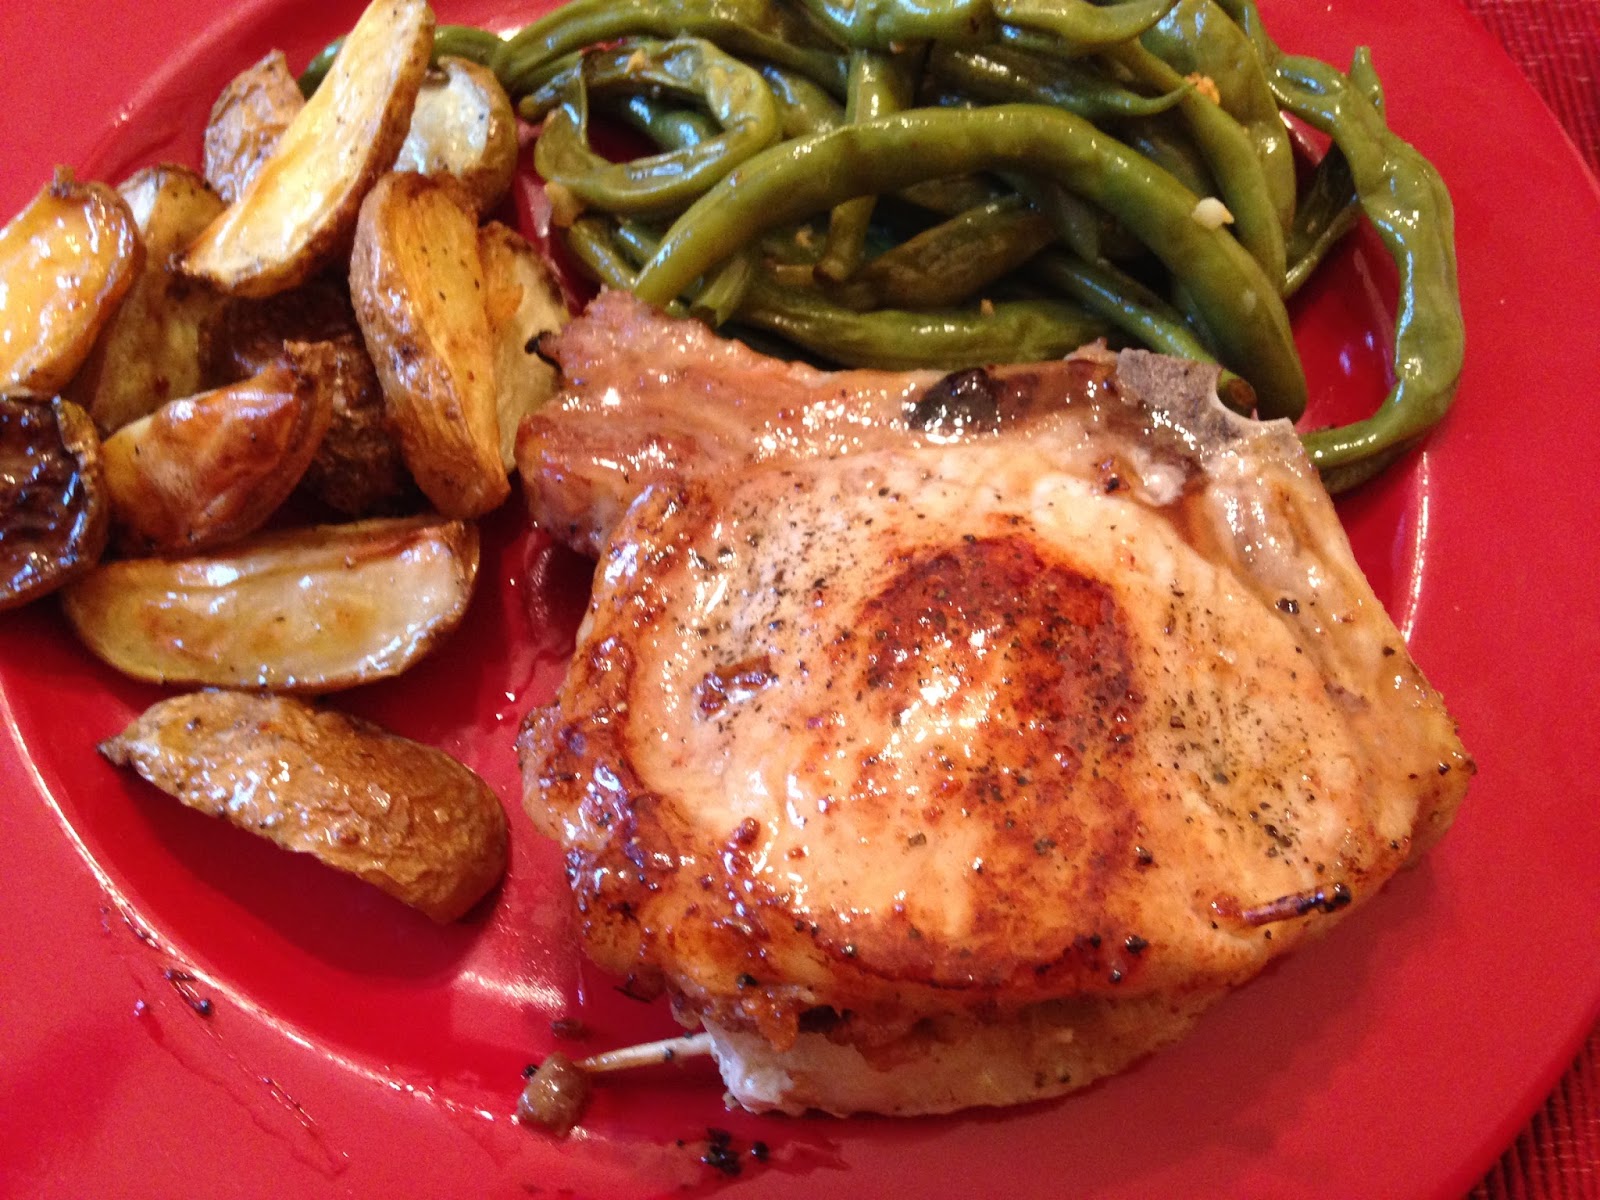
Orange Glazed Stuffed Pork Chops

This is another great fall dish - Stuffed Pork Chops with potatoes and green beans. Sounds like basic fare but it can be made into a "wow" meal by building interesting layers of flavor with just a few easy cooking techniques and a couple readily available herbs for seasoning. The stuffing has bread crumbs, cranberries, orange juice, onion and fennel seeds. Serve the chops with rosemary roasted potatoes and garlicky green beans as sides. 

For the stuffing
Tear up several pieces of good crusty country bread and pulse briefly in a food processor so that they are in approx 1/2 inch pieces not fine crumbs. Saute chopped onion and dried cranberries in a little olive oil. Season with salt and pepper. Add 1/2 teaspoon fennel seeds and 1/4 cup of fresh squeezed orange juice. Remove half of the liquid and set aside for later use in the glaze. Add the breadcrumbs to the remaining juice mixture and stir together. 

For the pork chops
Pick good looking loin chops minimum of 3/4 inch thick, thicker is better. 
Cut a pocket for the stuffing and spoon the stuffing in. Close with a toothpick or two.
Brown well on both sides in an oven proof skillet - cast iron works great!
Add 1/4 cup of water to the skillet and put in the oven pre-heated to 375 to finish cooking - about 20 minutes. 
For the potatoes
Cut roasting potatoes into wedges, drizzle with olive oil, season with salt, pepper and finely chopped fresh rosemary. Roast at 375 for 30 minutes, alongside the pork chops, stiring/flipping over once. 
For the green beans
Clean and trim the fresh green beans, steam in a steamer for just 5 minutes then take out and saute in a frying pan with olive oil and minced garlic. Season with salt and pepper.
For the orange glaze
Add the reserved orange juice mixture set aside from making the stuffing to the pan juice from the pork chops. Add a little water or orange juice if it is too dry or if you need to make more. Stir together to blend and spoon over the chops on the plate.


Tuesday, June 22, 2021

Steak and Arugula Salad with Roasted Herbed Cherry Tomatoes and Blue Cheese Crumbles


We sliced some leftover strip steak, put them over arugula, squeezed a little lemon juice, added these wonderful olive oily herby roasted tomatoes, some blue cheese crumbles and toasted bread crumbs. YES!!!!

Here's how to make these roasted tomatoes
https://ourgardenandtable.blogspot.com/.../herbed-cherry...


Saturday, May 8, 2021

Artichokes, Part I - "Moonstruck Stuffed Artichokes"

If you really like artichokes, you have found many ways to prepare and enjoy them. But for most people, if they have ever eaten artichokes at all, their familiarity with them begins and ends with one of these two ways -  
                       
1) Pulling the leaves off of a steamed artichoke, dipping them in melted butter or some kind of mayonnaise preparation and eating the tender inside of the leaf, or
 
2) Having them in some kind of cream cheese artichoke dip at a party.

Those are OK, but there are so many other, better ways to enjoy artichokes - what about grilled or roasted, or fried or stuffed or marinated or in a variety of pasta dishes or on pizza? I am going to start a series of posts through the Spring - because it's artichoke season - on a variety of ways to prepare and enjoy this versatile and tasty vegetable.
 
Yes, they are a little time consuming to prep but if you are a follower of this blog, you are most likely the kind of person who doesn't find that a problem. You know the results are going to be worth it for a special meal. And guys, listen, you can blow a girls mind by making a cool "wow factor" artichoke dish (it's not that complicated). At least it works with Lisa... : )
 
Our favorite way to enjoy artichokes is stuffed. We call the following recipe Moonstruck Stuffed Artichokes because they are like "Cosmo's moon!"   
  
    Moonstruck Stuffed Artichokes  
  

Ingredients:  
2 large globe Artichokes 
bread crumbs - home-made
garlic
diced pancetta
pecorino cheese
flat leaf parsley
oregano
toasted pine nuts
mint
Red pepper flakes
minced artichoke stalk
lemon zest
lemon juice
olive oil
salt & pepper

Prepping the Artichokes:


Pull off some of the tougher discolored outer leaves. Cut the top ½ to 1 inch off the tops of the artichokes. Using kitchen scissors, snip off the tips of the rest of the leaves. If the artichokes have long stems, good! Cut them off about 1/2 inch from the base, mince them and add to the stuffing mixture.


Stand artichokes in a Dutch oven; add 1 in. of water. Bring to a boil. Cover and reduce heat; simmer for 15 minutes. This will loosen up the artichokes enough to make stuffing easier. Let cool. In the meantime make the stuffing.  

The Stuffing:

Tear up and add several thick slices of crusty Italian bread to a food processor.. Grind the bread to a coarse crumb.
  
Toast the pine nuts in a frying pan. Then remove to a bowl.
 
Using the same pan, sauté the pancetta in a little olive oil until it is crisp. Then remove and put on paper towels.
  
Saute the garlic in olive oil until fragrant, then add homemade bread crumbs with salt and pepper. Stir to coat the crumbs well with the garlic & olive oil and toast.
  
Dump the toasted bread crumbs into a mixing bowl and let cool, then add the pancetta, the pecorino cheese, parsley, oregano, mint, red pepper flakes and lemon zest. Mix well and taste to see if you think it needs any additional seasoning. It should be moist from the oil but not wet.  

Stuffing the artichokes:

Gently pull open up the center leaves and scoop out the choke and any thorny inside leaves. Remove as much as possible. A melon baller works great for doing this.
 
With a spoon and your fingers push the stuffing in between all the leaves.


Put the stuffed artichokes back in the Dutch oven in a broth of white wine, water and chunks of lemon, and simmer, covered for about 45 minutes.

How to eat - pull off individual leaves. They will be like little spoons holding the stuffing. The cheese will melt into the stuffing helping it cling to the inside of the leaves. You will get a little stuffing along with the artichoke "meat" with each leaf bite. When you get down to the heart, just cut it up and eat, the flavors from the stuffing and the cooking broth will be infused in it. That's right!

Out on the back deck with a side of Italian sausage, watermelon, arugula salad, crusty bread & olive oil and, of course, wine.